VS Code Extension from PostMan Got released - Test your API #D365Fo
The Postman VS Code extension
This extension is currently in its beta phase. We appreciate your feedback and patience as we fine-tune its capabilities.
The Postman VS Code extension enables you to develop and test your APIs in Postman directly from Visual Studio Code.
Posted by : Hariharasudan kandaswamy
Source References : marketplace.visualstudio.com

Signing in to Postman
The Postman VS Code extension is available on Free, Basic, and Professional plans.
Sign in to Postman, and select a team to access workspaces in the team. When you select a workspace, you'll be able to see the request history for that workspace in the sidebar. You must sign in to Postman to use the VS Code extension.
- Open the VS Code extension.
- Select Sign In in the sidebar. The extension will open a new screen that directs you to sign in from your browser.
- In your browser, select a Postman team then sign in to Postman. After you sign in, you can close the browser tab and return to the extension.
To learn more about signing in to Postman, see Postman's documentation.
If you don't have a Postman account, create an account to sign in to use the VS Code extension:
- Open the VS Code extension.
- Select Create Account in the sidebar. The extension will open a new screen that directs you to create an account from your browser.
- In your browser, enter your information then select Create free account.
To learn more about signing up for Postman, see Postman's documentation.
Sending requests
You can create and send HTTP requests.
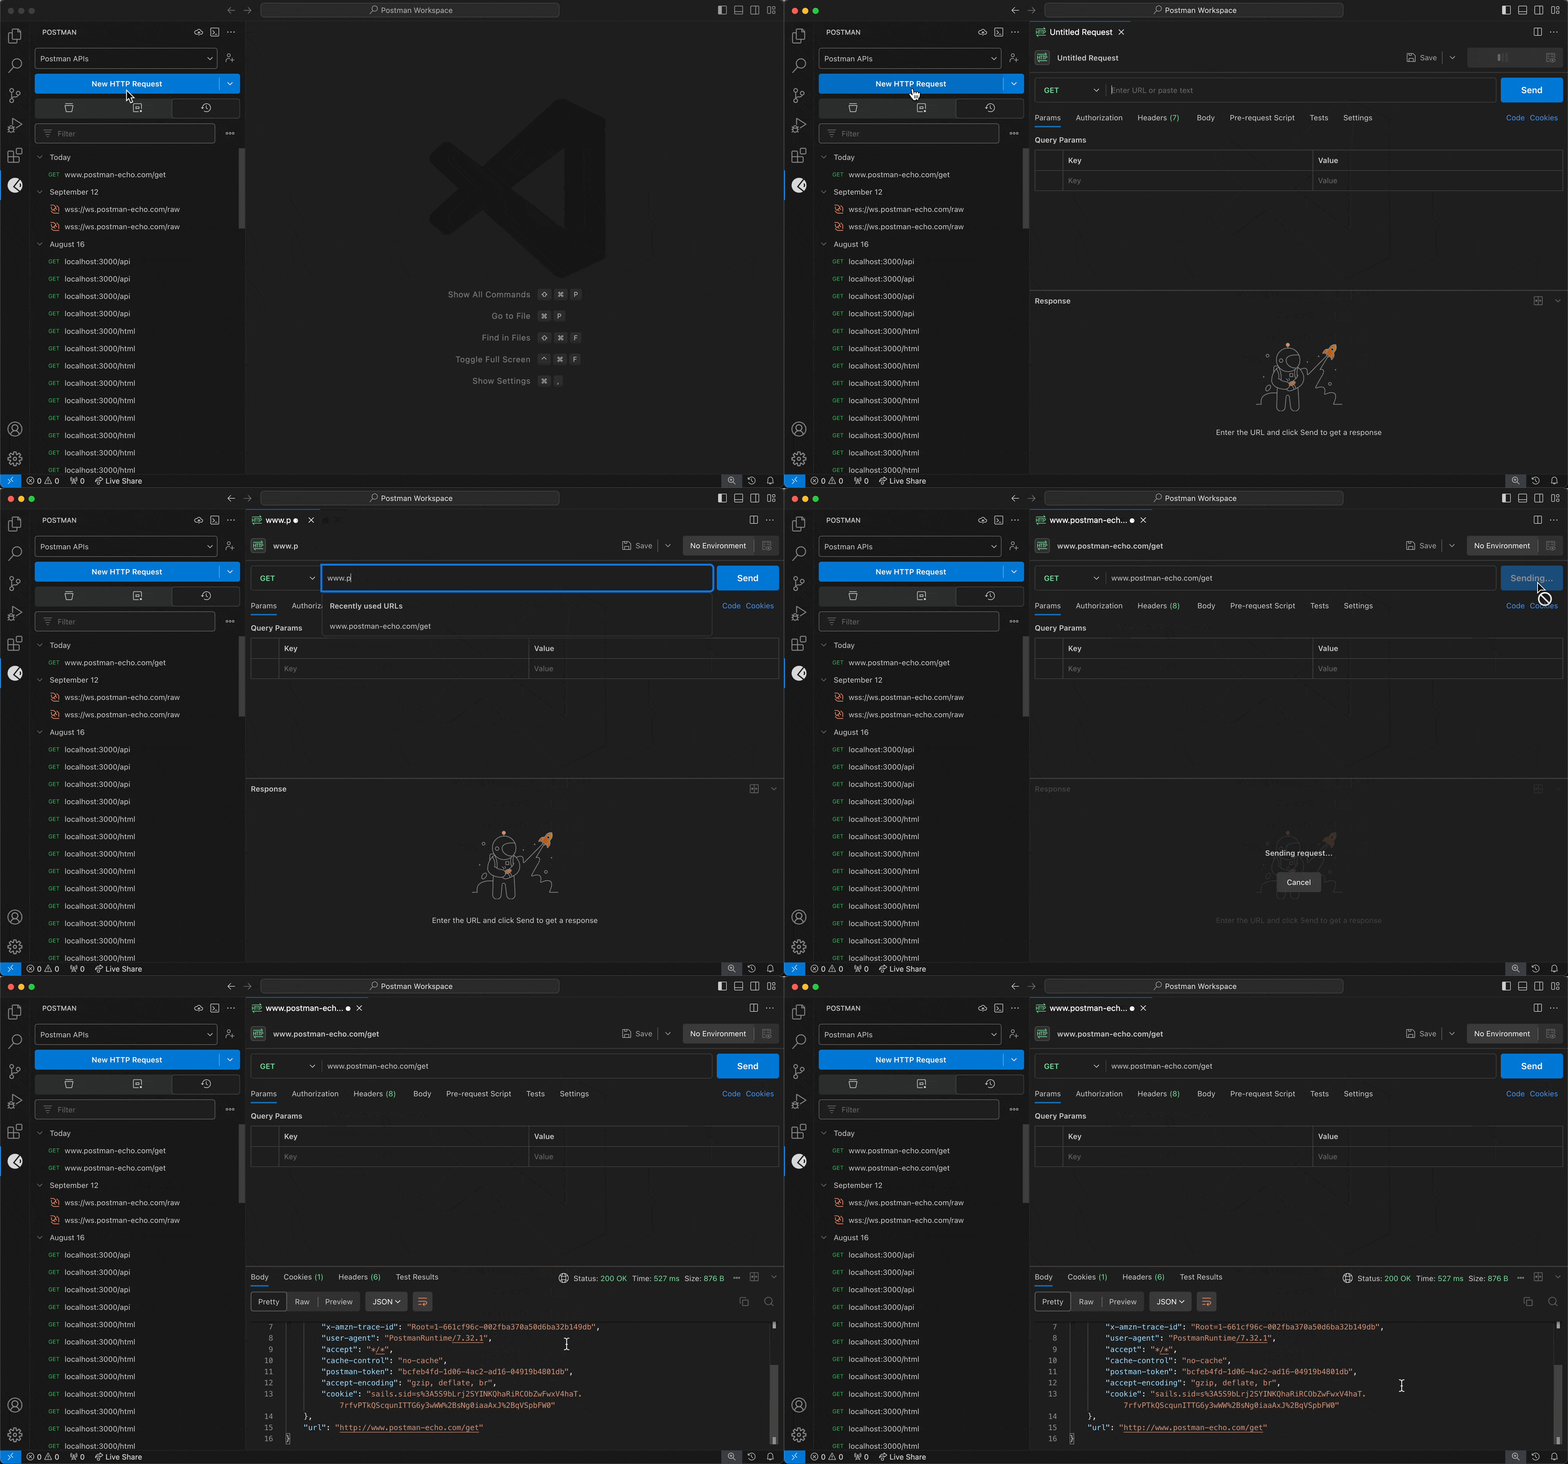
Select a workspace from the workspace dropdown menu in the sidebar.
You can also create a new workspace from the VS Code extension.
Select the request dropdown menu in the sidebar, then select HTTP.
If you previously selected HTTP from the request dropdown menu, you can create another HTTP request by selecting New HTTP Request in the sidebar.
Specify the details you need for your request.
Select Send.
Requests sent in the VS Code extension appear in your workspace's request history in both the extension and the Postman app.
To learn more about creating and sending HTTP requests, see Postman's documentation.
You can also use the
Postman: Create a new HTTP Requestcommand from the Command Palette to send a request.
Sending multiprotocol requests
You can create and send raw WebSocket and gRPC requests.
- When you create a request, select the request dropdown menu first, and select WebSocket or gRPC instead of HTTP.
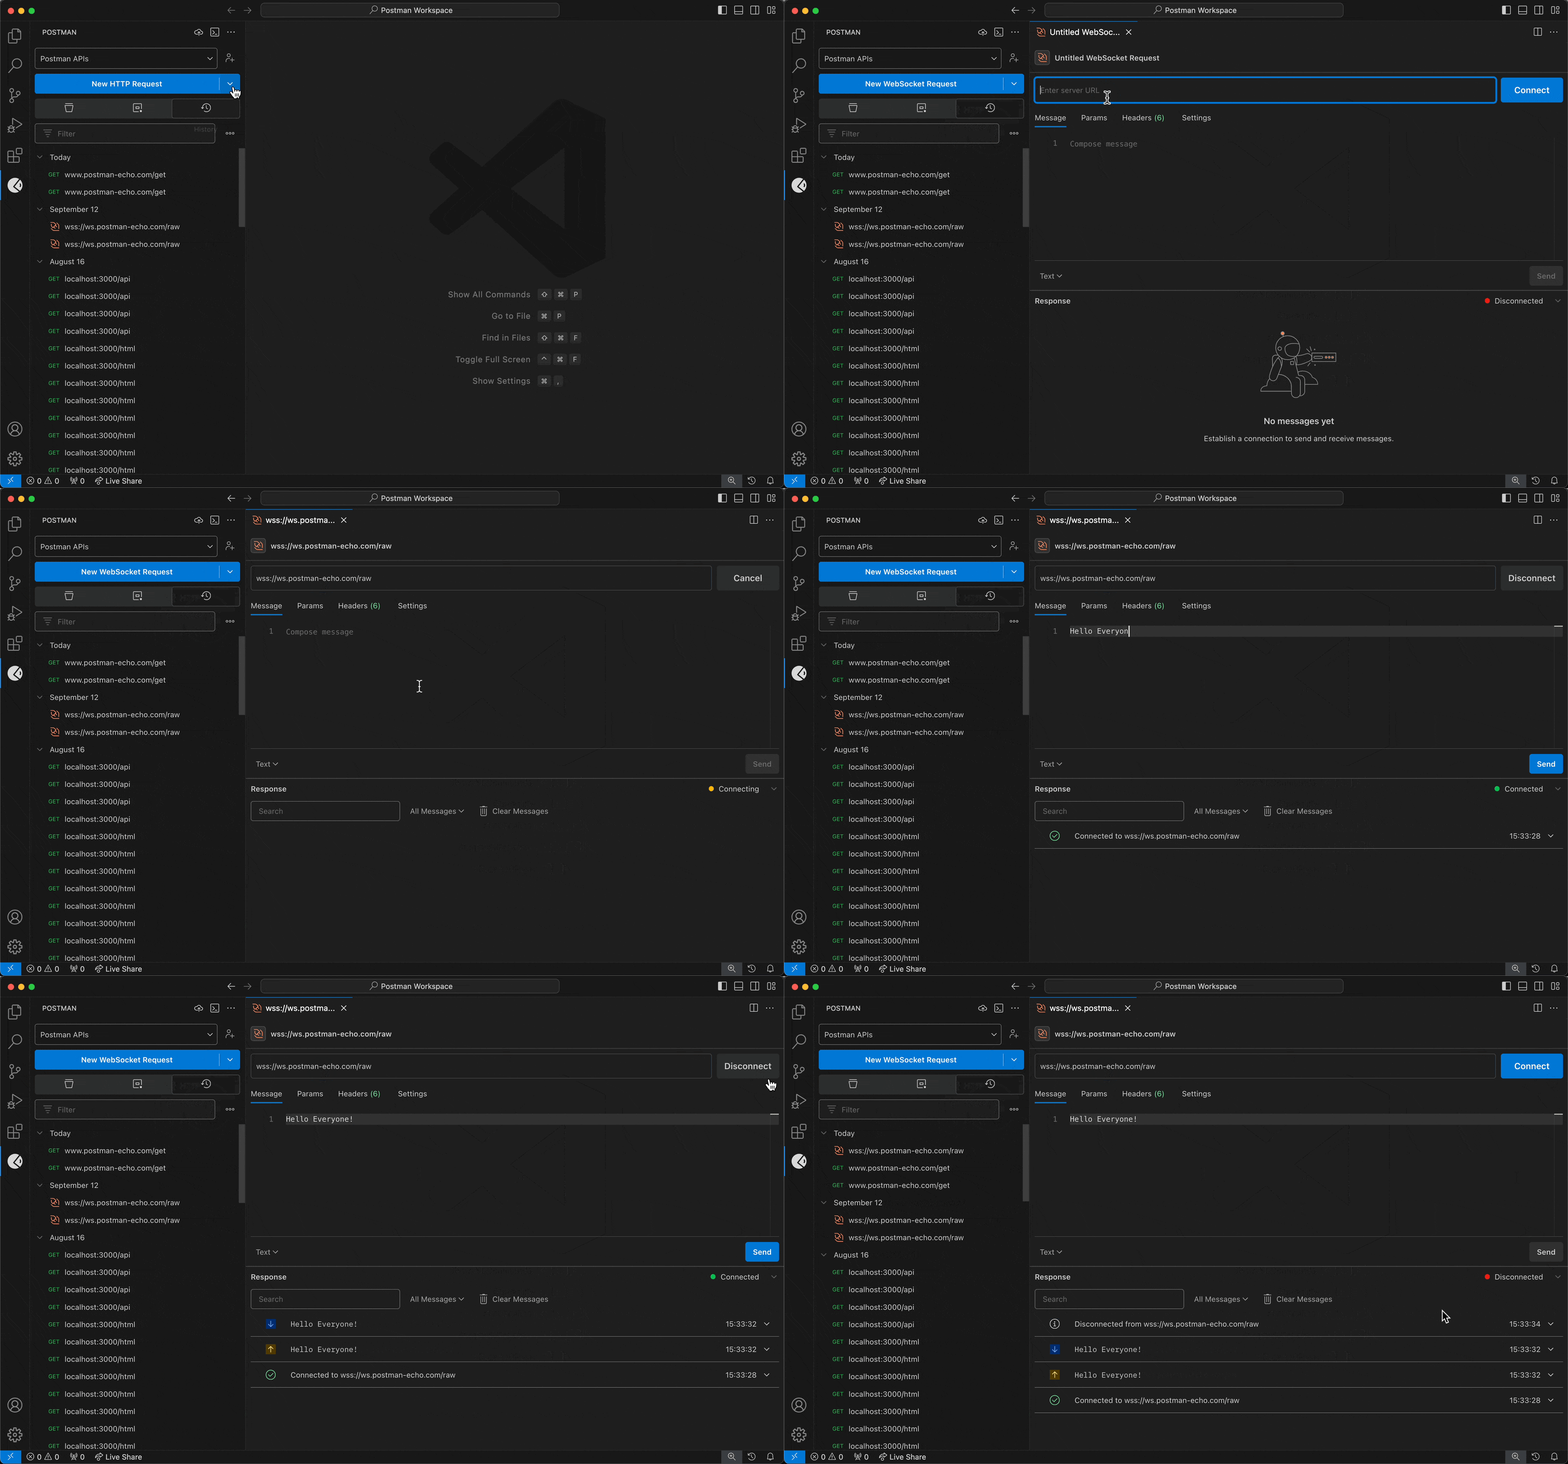
For WebSocket:
- Enter the WebSocket server URL. A WebSocket URL begins with
ws://orwss://. - Select Connect.
- To disconnect your WebSocket request's connection, select Disconnect.
- Enter the WebSocket server URL. A WebSocket URL begins with
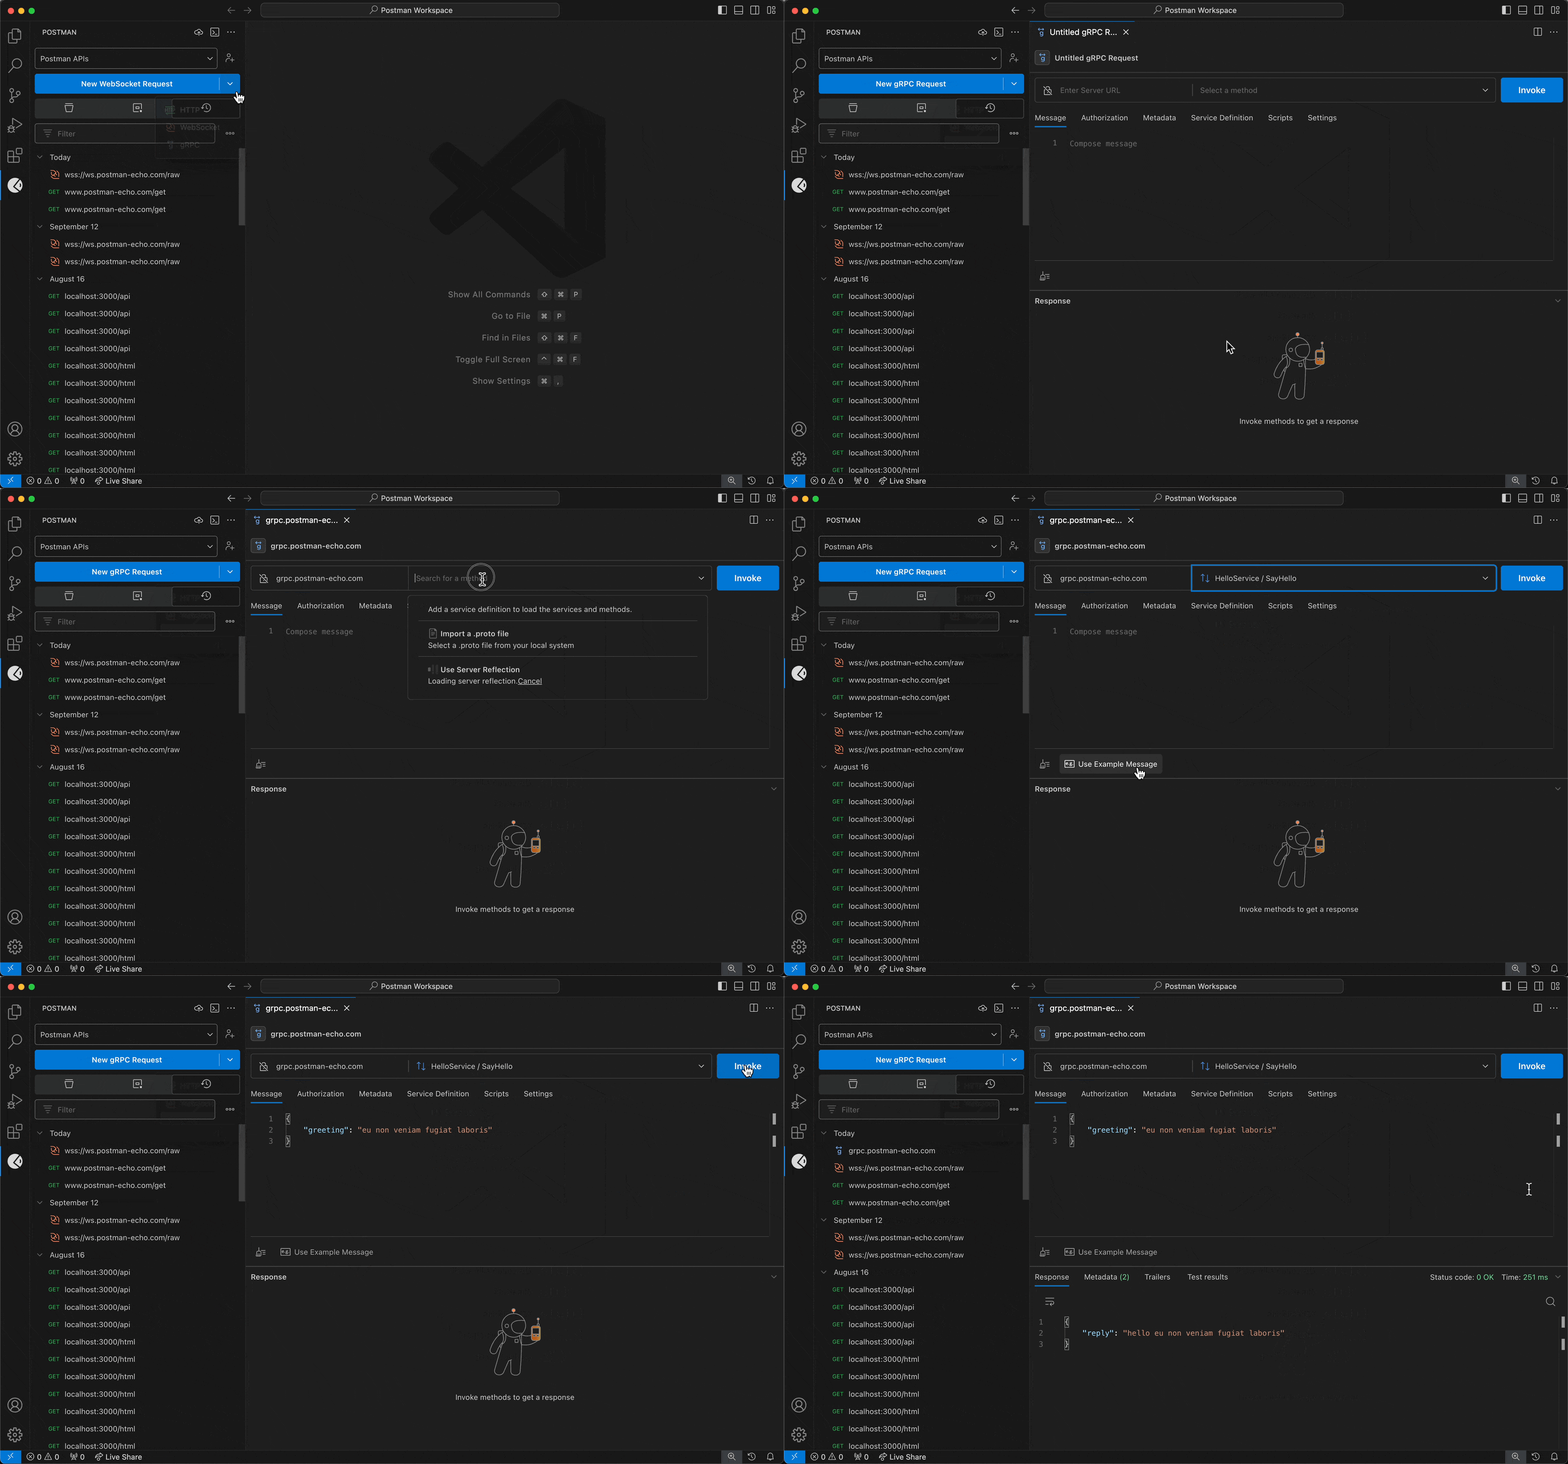
For gRPC:
- Enter a URL into Server URL.
- Select the Method selection dropdown to select the method you want to invoke.
- Configure a service definition.
- Select Invoke.
To learn more about creating and sending WebSocket requests, see Postman's documentation.
To learn more about creating and sending gRPC requests, see Postman's documentation.
Sending requests from your history
You can send requests previously sent in a workspace using the VS Code extension and the Postman app.
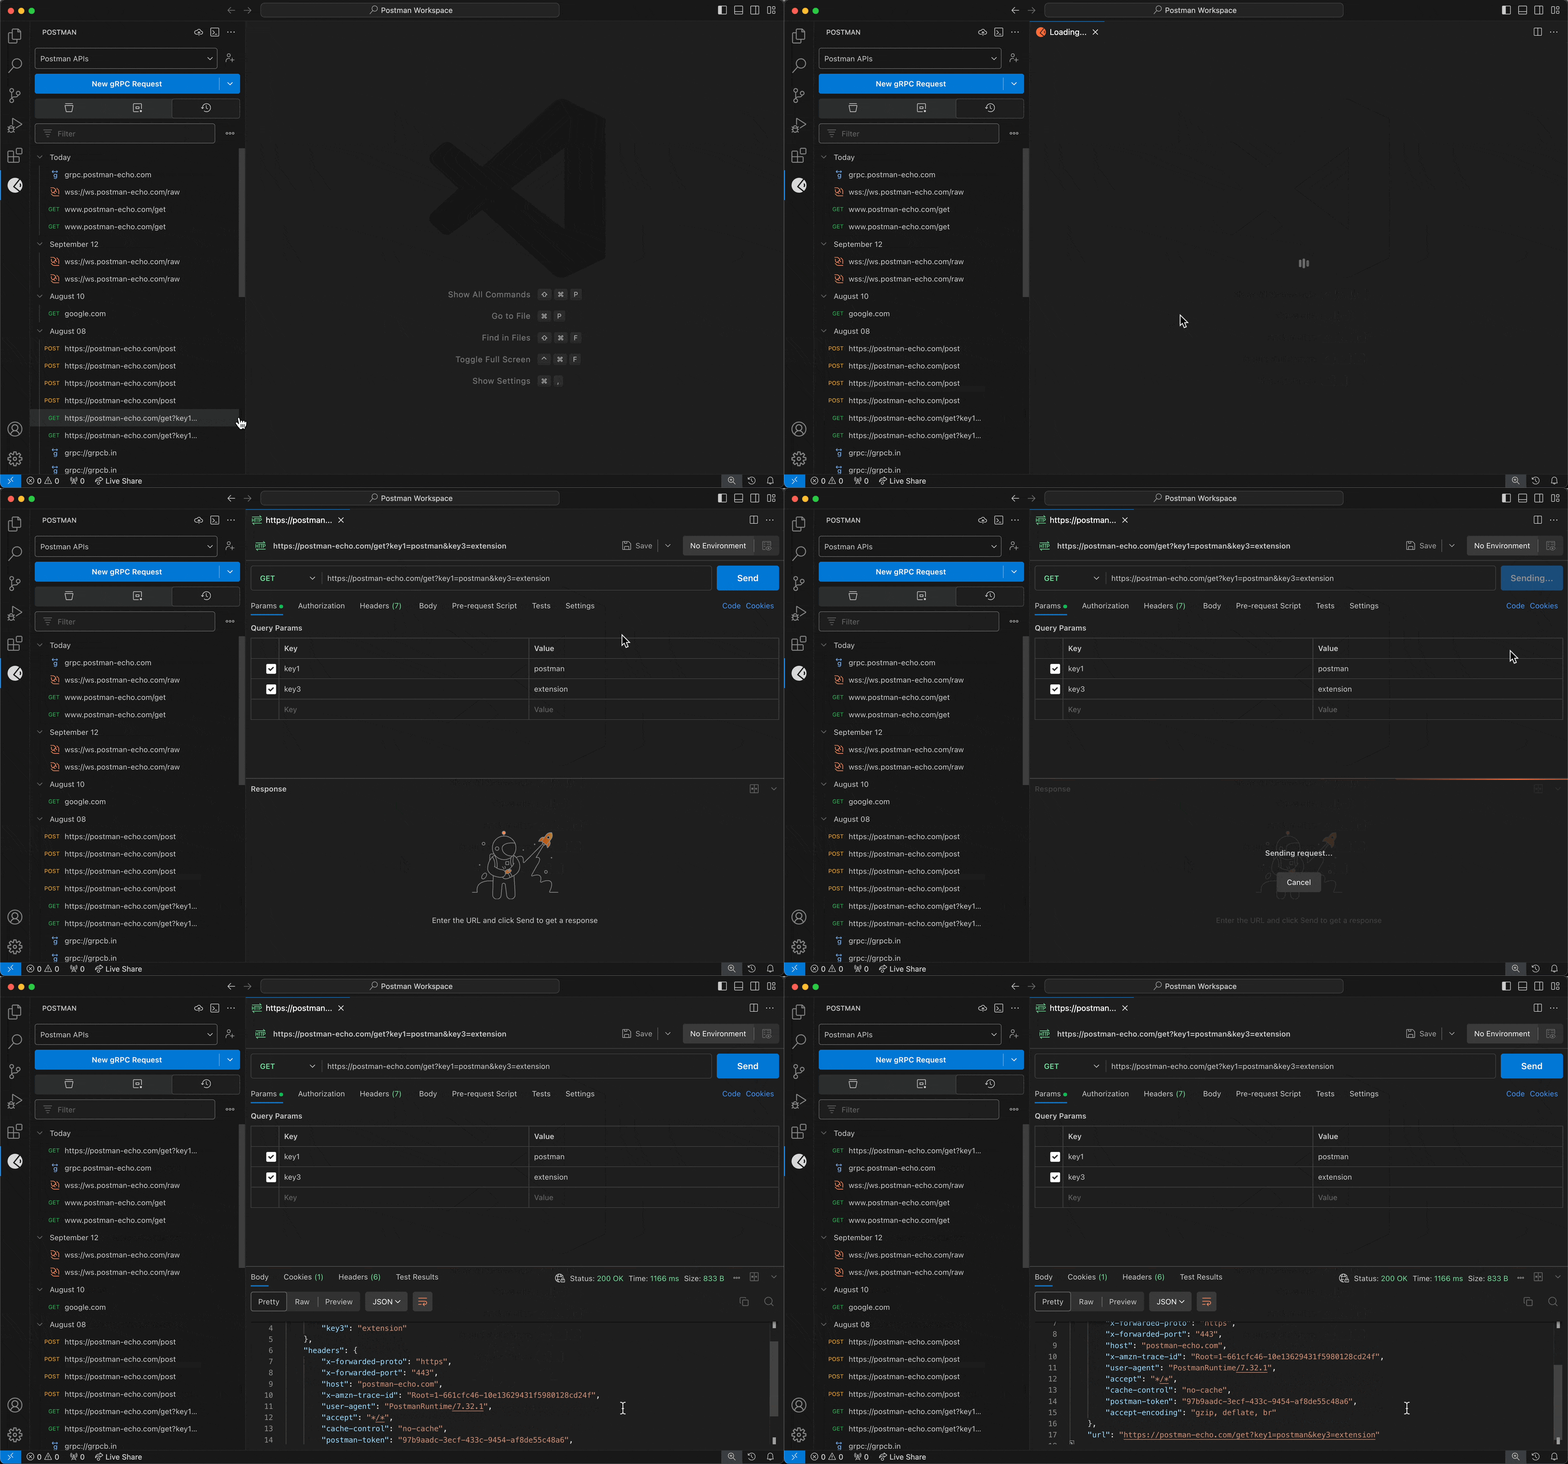
- Select a workspace from the workspace dropdown menu in the sidebar.
- Select the History tab.
- Select a request from your history, and edit the request if you'd like.
- Send the request.
Using collections
You can create new collections to group HTTP requests, and you can manage collections with HTTP requests.
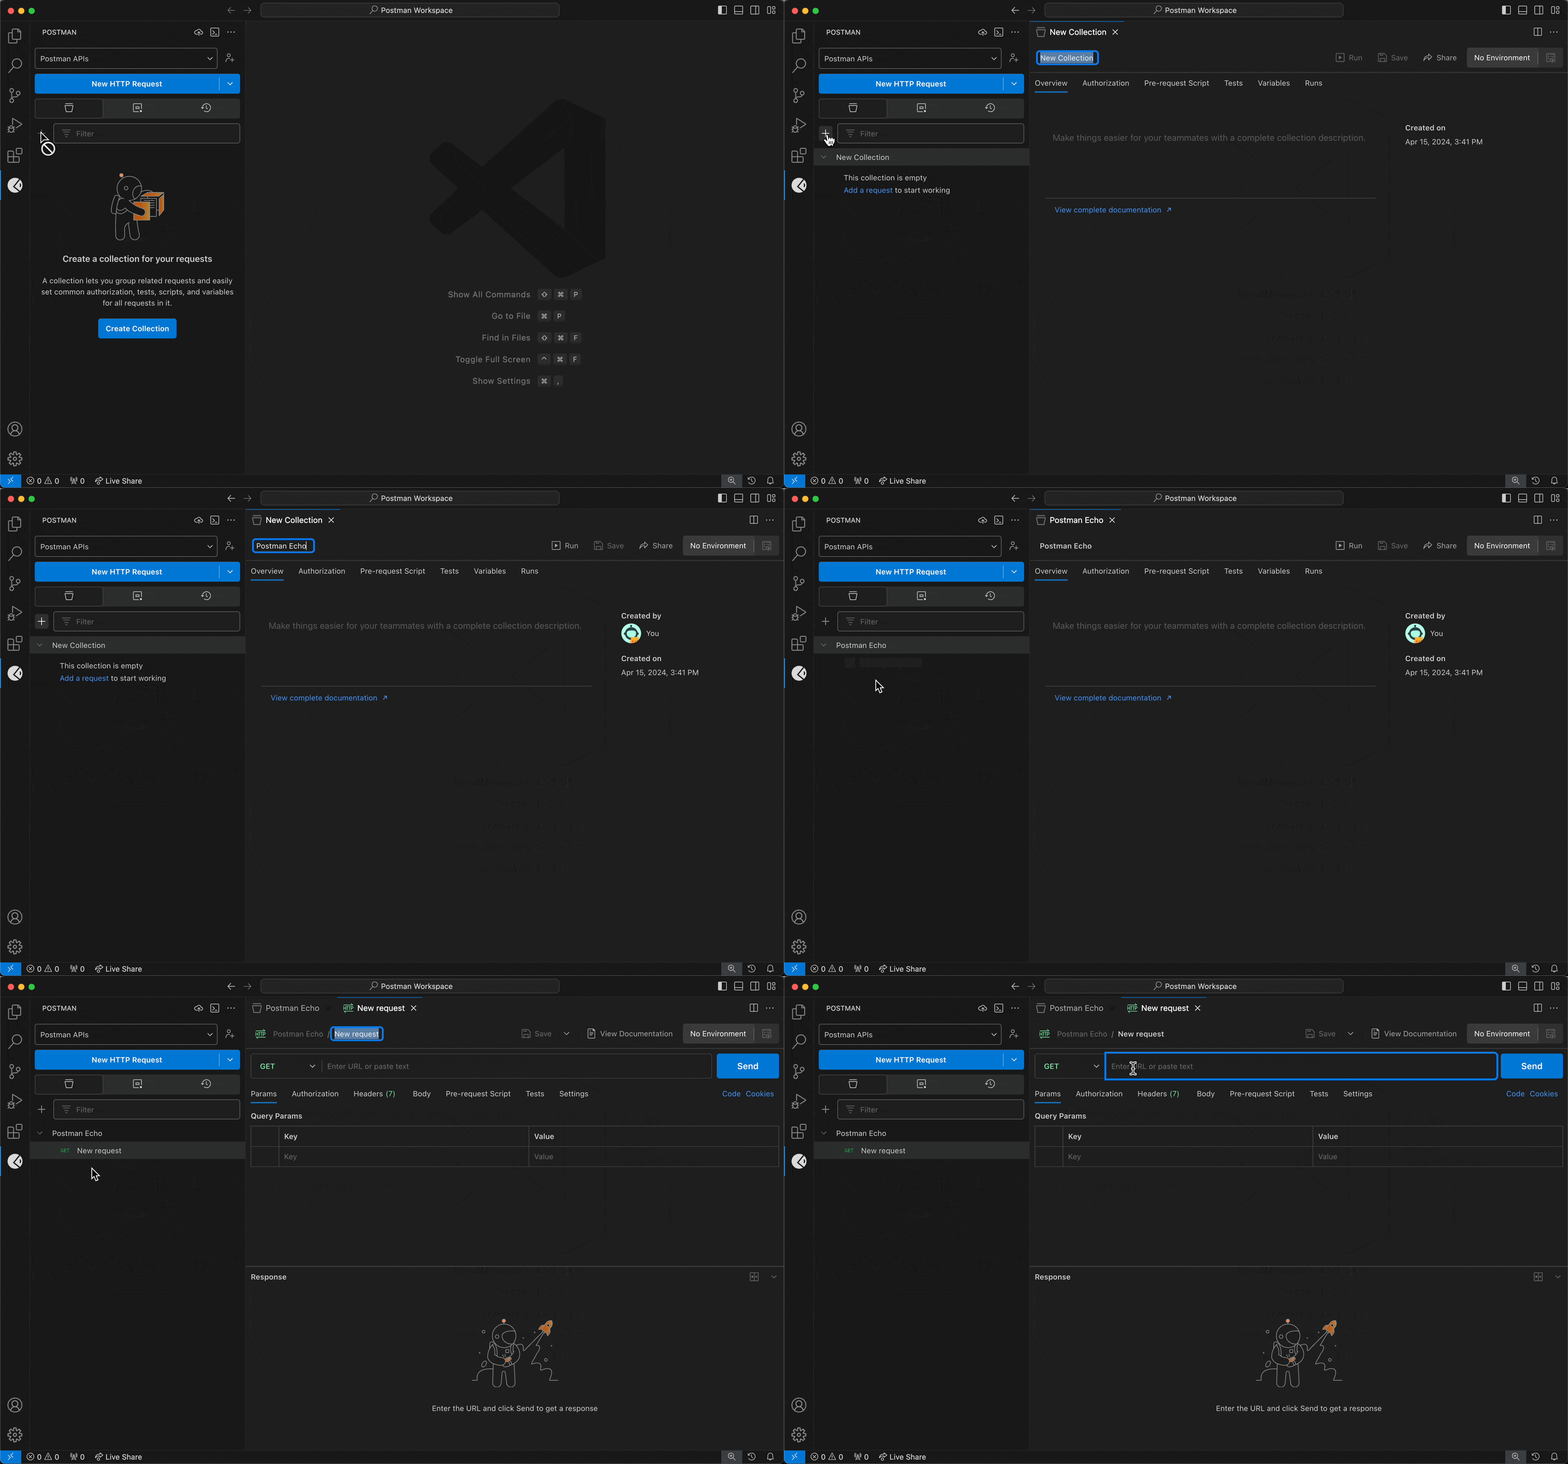
To create a collection and add an HTTP request to it, do the following:
- Select a workspace from the workspace dropdown menu in the sidebar.
- Select the Collections tab.
- To create a collection, select the + icon.
- To add an HTTP request to a collection, select the more actions icon to the right of a collection, then select Add Request.
To customize and configure a collection with HTTP requests, do the following:
- Select a workspace from the workspace dropdown menu in the sidebar.
- Select the Collections tab.
- Select a collection.
- Select Authorization to configure authorization details for your collection.
- Select Pre-request Script to define a pre-request script for your collection, which will run before requests are sent to the server.
- Select Tests to define a test script for your collection, which will run after a response is received.
- Select Variables to define values for collection variables to share across all requests in the collection.
To learn more about using collections, see Postman's documentation.
Managing environments
You can add a set of variables to an environment that you can use in your requests.
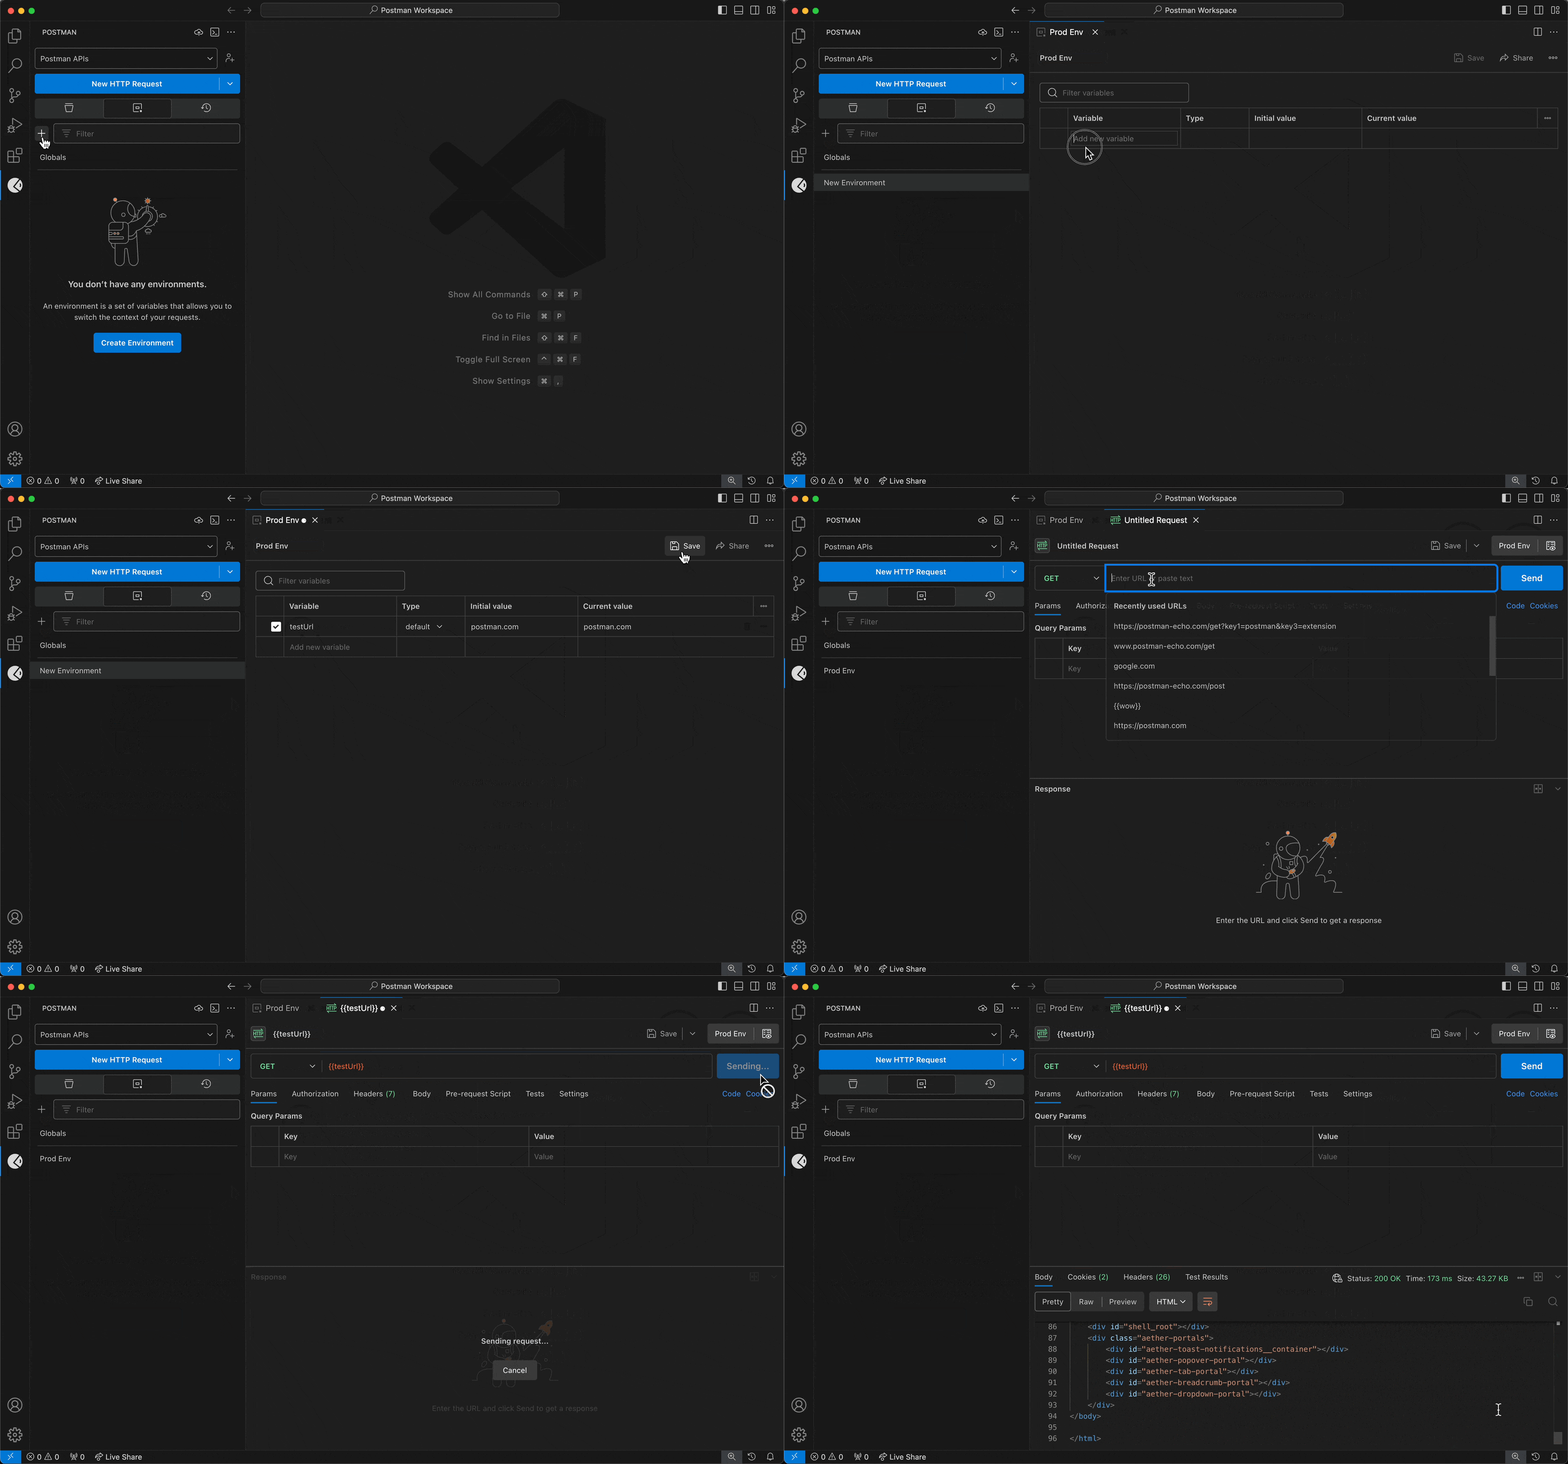
To create an environment and add variables to it, do the following:
- Select a workspace from the workspace dropdown menu in the sidebar.
- Select the Environments tab.
- To create an environment, select the + icon.
- Add variables to the environment.
- Select Save.
To use environment variables in a request, do the following:
- Select the Collections tab.
- Select a request.
- Select an environment from the environment selector in the top-right corner.
To learn more about managing environments, see Postman's documentation.
Using cookies
You can view and edit cookies associated with different domains. You can then use the cookies stored in the cookie jar when sending HTTP requests in Postman.
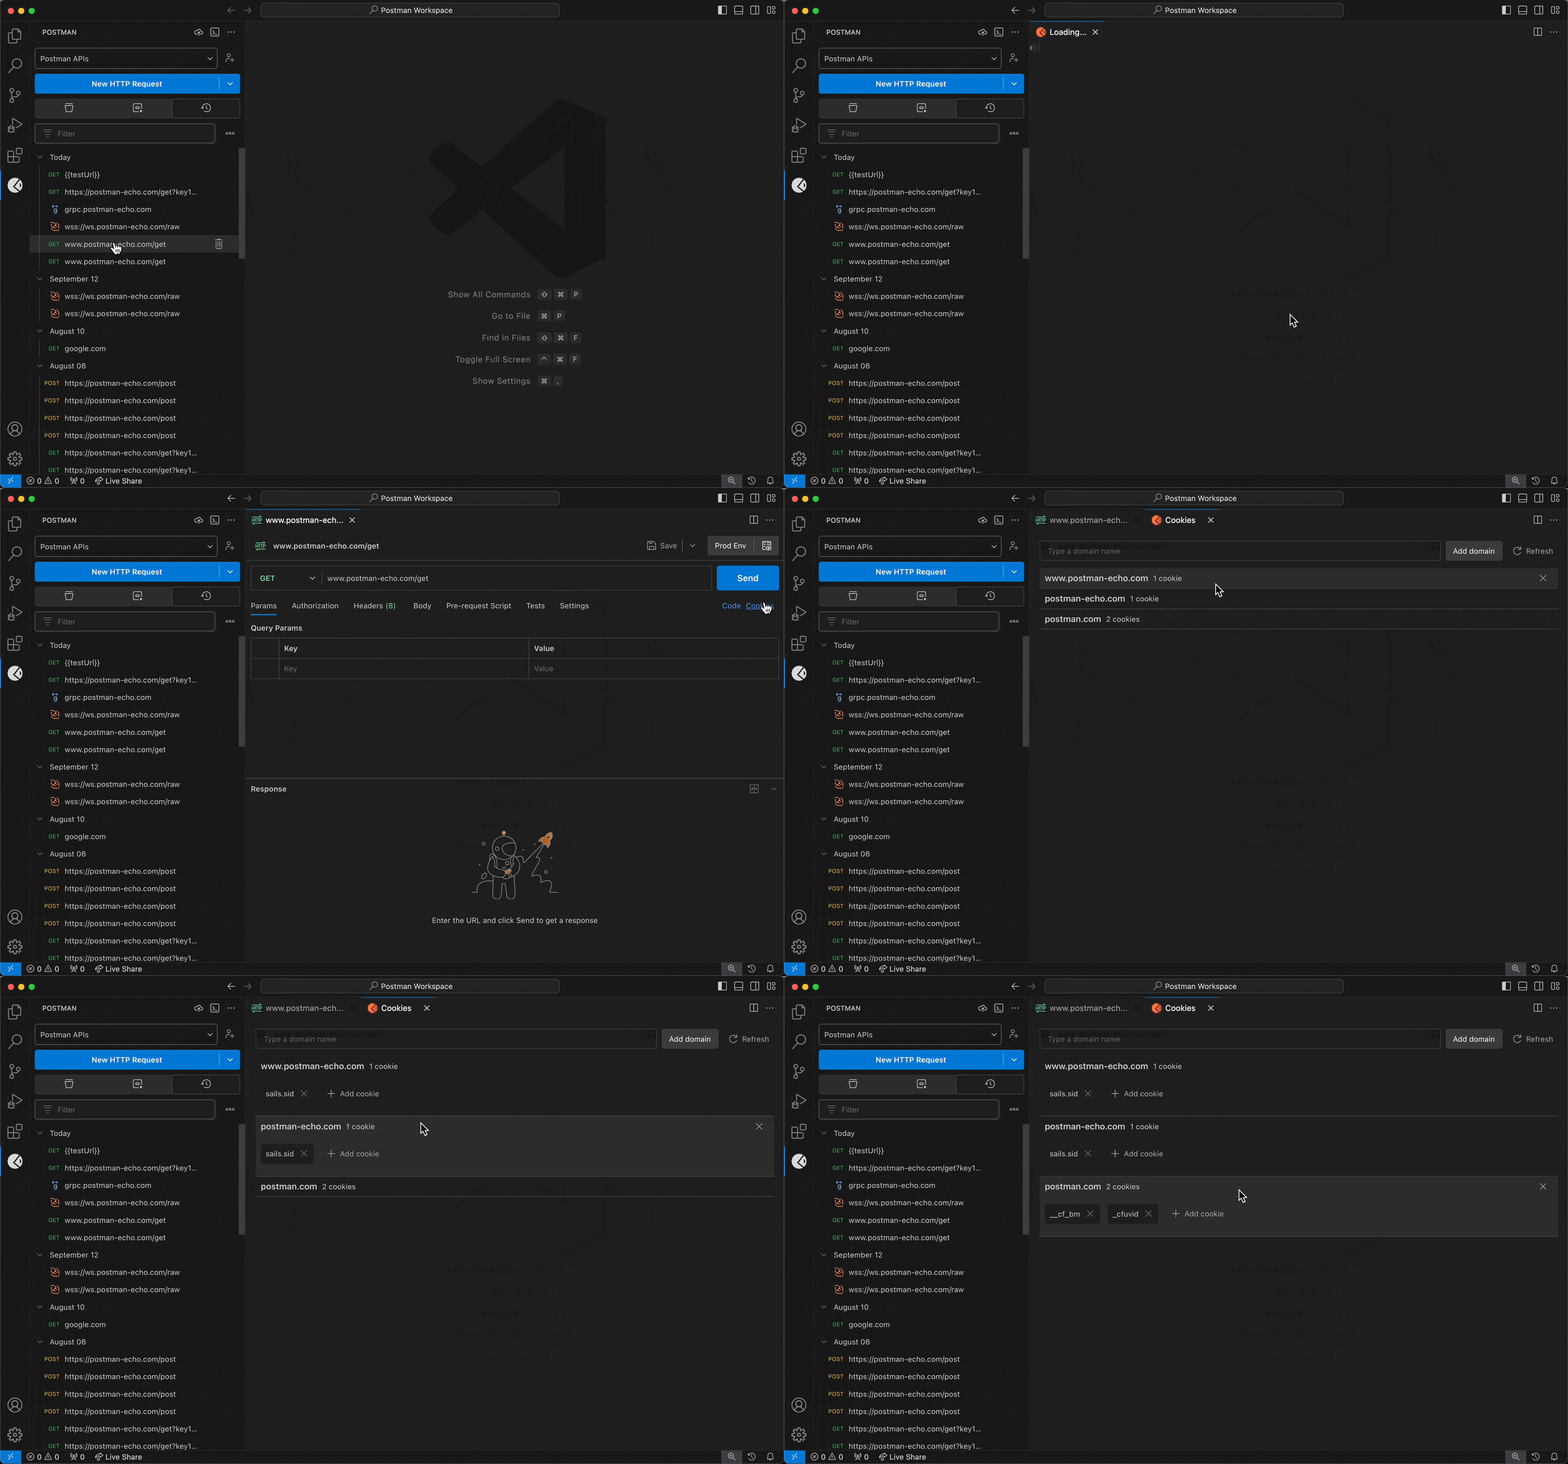
To manage cookies in the VS Code extension, open an HTTP request, then select Cookies (below Send).
You can also open the cookie editor with the
Postman: Open cookies editorcommand in the Command Palette.
To learn more about using cookies, see Postman's documentation.
Importing with cURL commands
You can use cURL commands to import data and create requests from the data.

Select a workspace from the workspace dropdown menu in the sidebar.
You can also create a new workspace from the VS Code extension.
Select the request dropdown menu in the sidebar, then select Import cURL.
Enter your cURL command into the input field, then press Enter. The VS Code extension opens a request in a new tab.
To cancel entering a cURL command, press Escape.
Extension shortcuts
- Open the Postman extension - Cltr + Win + P / Cmd + Opt + P
- Create a new collection - Cltr + R Cltr + C / Cmd + R Cmd + C
- Create a new environment - Cltr + R Cltr + E / Cmd + R Cmd + E
- Open a new request tab - Cltr + R Cltr + N / Cmd + R Cmd + N
Sharing feedback
You can create a bug or feature request for the VS Code extension.
- Select the Report Bug / Share Feedback icon at the top of the sidebar. The extension will open a new screen that directs you to GitHub in your browser.
- In your browser, select Get started to create a bug or feature request.
- Enter the bug or feature request details, then select Submit new issue.
Viewing the extension log
The extension log displays events related to the VS Code extension.
- Select the Views and More Actions icon at the top of the sidebar.
- Select Open Extension Log. The extension log will open in a new tab.
Viewing the version
To view the version of the VS Code extension you're using, do the following:
- Select the Views and More Actions icon at the top of the sidebar.
- Select Version.
Comments
Post a Comment